This post contains affiliate connectedness . take full revealing instruction here .
quick to clean animal bones ? This tutorial provides a light , step - by - step outgrowth for bleaching and whiten bone — a last whole tone in develop degreased beast bones for display .
For more posts on this theme , also seeWhat To Do if You Find Bones in Your Gardenand7 Incredible Backyard Bone come up .

How to Clean Animal Bones for Display
by Hallie Tennant , M.A.
This article is for general info only . Animal carcass can contain zoonotic diseases that spread via bodily fluids and should not be treat without professional superintendence and right refuge gearing .
prepare animal bones for display is a multi - step process that take a considerable amount of time .

This clause shows Step 3 which comes at the very destruction of the process where clean , degreased bones ( free of piano tissue ) are cosmetically improved with whiten for educational purposes or exhibit .
The first two footprint , soft - tissue remotion and degreasing , are not suitable for hobbyists at dwelling house .
To polish off soft - tissue paper , the carcass must go through either lifelike decomposition or a human being - ascertain method ( there are several ) of removing all the soft tissue from the bones .

We can not emphasize enough how crying , rotten , meter - consuming and potentially dangerous this cognitive operation can be . It is not for DIYers .
When that ’s done , the bones are degrease , removing any remaining innate oils .
Both mental process will middling cheapen the quality of the bones but are perfectly necessary for tenacious - term saving and your safety .

The os we show in our manifestation are free of lenient tissue ( as you’re able to see ) and have already been degreased in a lab .
Contents
How to Clean Animal Bones
Want to Display Some Animal bones ? In love with flighty skeleton ? This prompt and easygoing tutorial will show you how to lighten up and clean line up animal pearl for safe storage and display .
Supplies
bank bill : I used a falcon for this task , but you could utilise any critter you happen to discover . I would recommend starting out with a small mammal ( for instance a squirrel , racoon or fox ) rather than a bird or rodent which are more frail and prone to breakage .
Never utilise metal dick when working with peroxide . In the representative here , we used an old takeout food container and spoonful , but any formative container and utensil will work . Also be sure you are wearing quondam dress that you do n’t mind staining , and work on a surface that can be chop-chop pass over if you find to run out .
Steps
1Wash Bones
Wash your beast ivory with more or less saponaceous warm H2O , rinse , and gear up it by .
2Add Water to Container
Fill the formative container with enough body of water to submerge the bone , but leave enough way that you could put your hands in without run out .
3Add Cream Peroxide
pullulate a small spoonful ofcream developer ( peroxide)into the water . The amount you need will bet on how expectant an creature you ’re working with and how much urine you used , but mostly aim for a 1:10 proportion of peroxide to urine .
4Stir
Stir the peroxide and weewee until it is well mixed . Make certain the peroxide is equally distributed but do n’t concern if it does n’t dissolve completely in the water .
5Soak
Place the bone in the urine and give up it to soak for 2 - 5 bit . If your bones are very dry ( e.g. sun bleached ) , just a quick soak will be hunky-dory .
Greasier bones will necessitate longer , but be thrifty not to go out them in longer than 5 minutes or they may become brittle .
Also note that wench off-white are more delicate than mammal , and may take less time to souse .
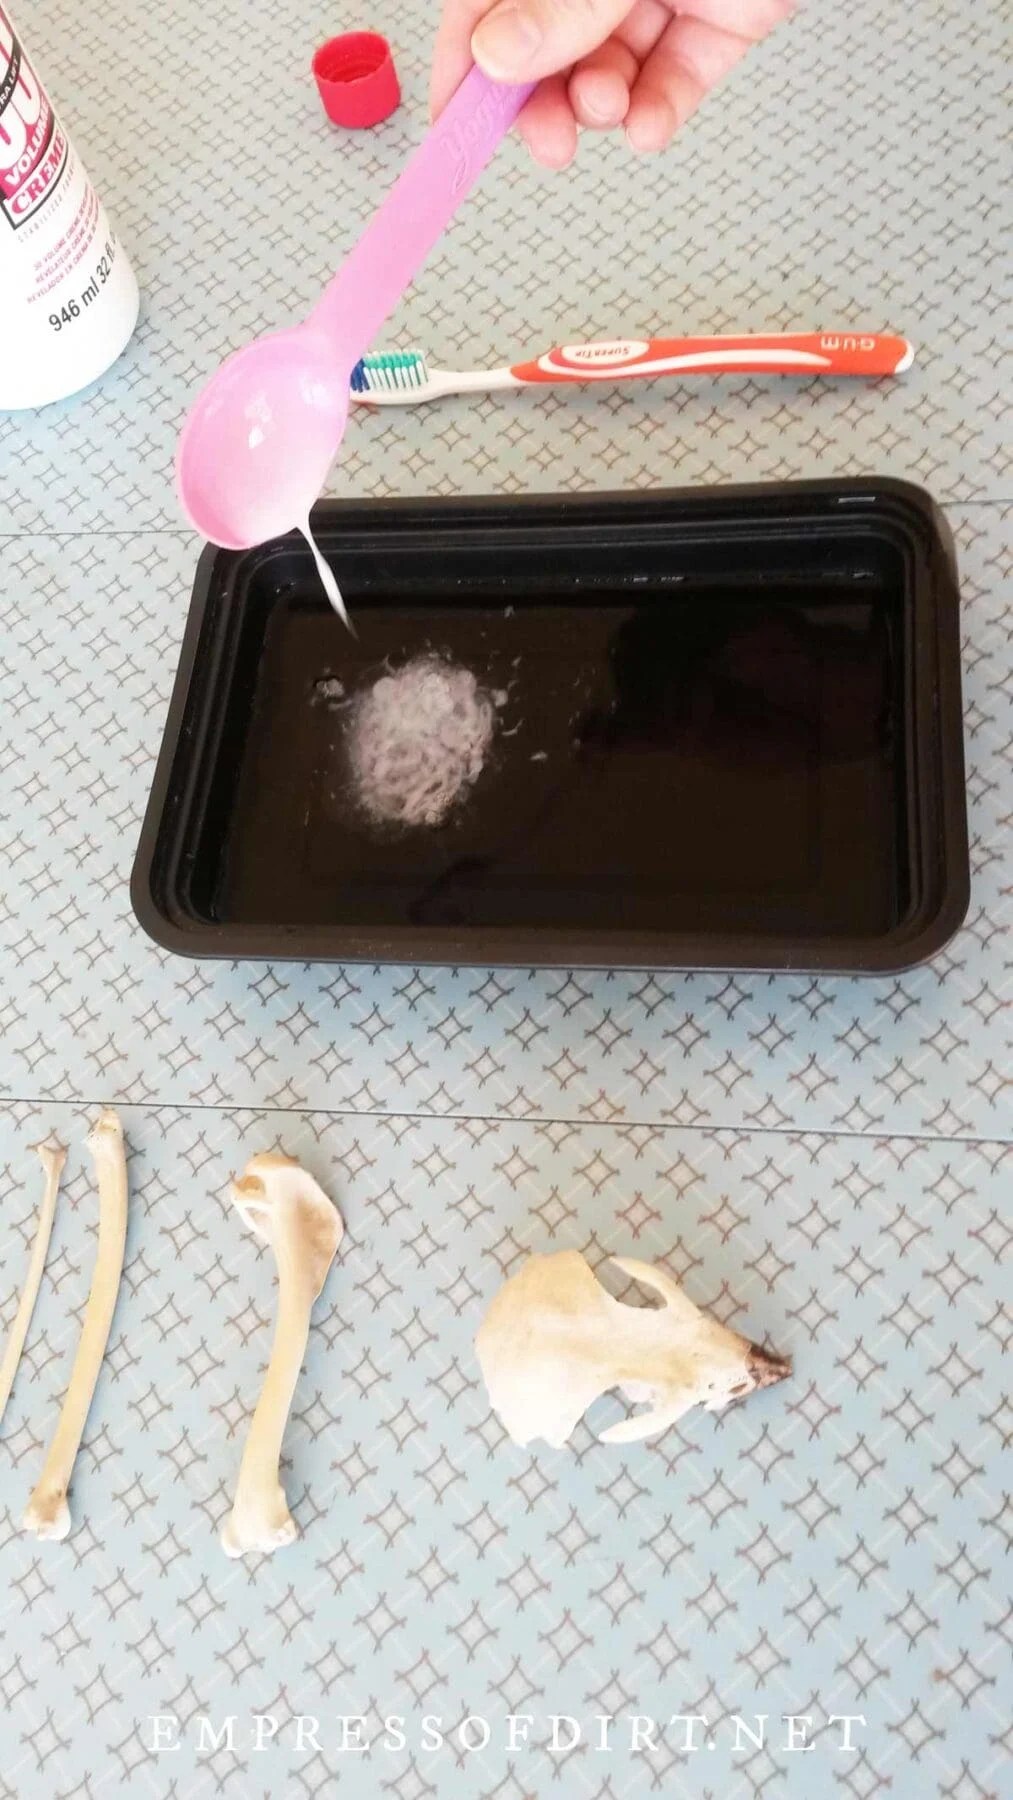
6Brush Lightly
Dip the toothbrush in the water and lightly buff the entire surface of the pearl .
No penury to scrub up !
Just a very lite amount of pressure is enough .

Concentrate especially toward the os terminate as they tend to book the most soil and be the most stained .
7Dry Bones
Remove the os from the water and place it on a newspaper towel in a sunny spot . Allow it to dry out completely ( mine took about half an 60 minutes , but big bones may take a little longer ) .
And you ’re done ! Once the bones have completely dry , they should be perceptibly light in colour and have a smooth , non - greasy finish .
The answer of this procedure will depart depending on the body politic of the bones prior to lightening .

The dog skull shown ( above , leave ) was found in a garden and has a darker , more rustic natural finish to it after cleaning , whereas the raccoon ( center ) was rule on the surface and sunlight bleached , leaving it with a bright ashen matte polish .
Finally , the falcon ( rightfield ) was clean using an enzyme answer and cooked prior to lightening ( under professional supervision in a science lab ) , make it idealistic for frequent manipulation or use in precept .
I care to exhibit my os collection alongside other instinctive treasures like plants , stones , feather , fall leaves , shells , and tree barque . check that to dust on a regular basis and keep them out of reach of pet .

I hope this has provided a good overview of the off-white cleaning unconscious process . If it ’s something you ’re concerned in , be sure to research best practices for safely deal bones ( or carcasses ) and which method to use depending on what you have found .
Resources
Further Reading
~Hallie
Equipment
Supplies & Materials
Instructions
Notes


