Related
Do you eff your lawn but do n’t love the upkeep ? Or have a gamey - traffic area where natural grass battles to survive ? possibly it ’s meter to study artificial eatage and kiss your worries goodbye .
Just ideate it , a pure lawn without any sustainment . No mowing , no fertilizing , no yellow spots , no edging . None of the con of a natural sens lawn . If you ’re still not sold on the idea , have a spirit at ourcomparison between natural and artificial grassto help you make a conclusion . Now , you ’re probably wondering how to install unreal grass .
You ’ve add up to the correct place . Because at Backyard Boss , we have a team of experts on everything relate to the backyard . So sit back , relax , and espouse this tutorial for installing an artificial lawn .

Things You Need
You need to gather all the tools and equipmentbelow before you could get start on your project .
Step-By-Step Guide
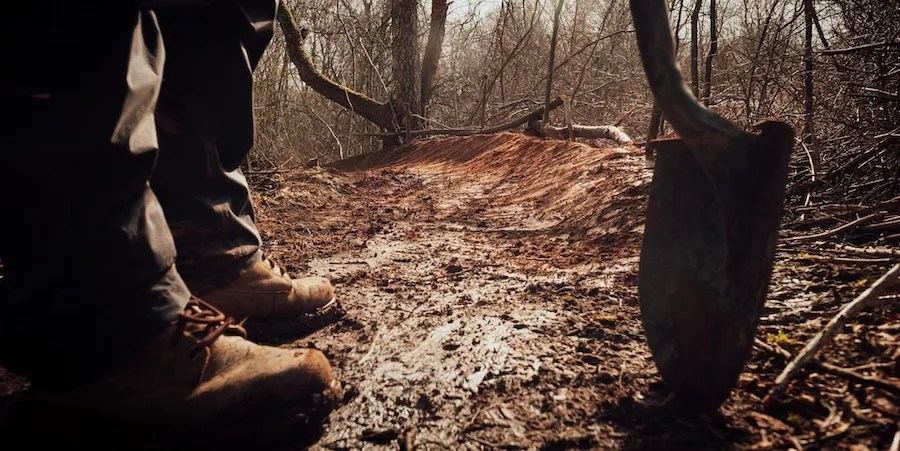
Step one: Dig
range Credits : Tim Foster via Unsplash
Like most projects , you have to go down before you’re able to go up . instal artificial skunk is no unlike . You first need toremove the live greensward or topsoil . For this , you want to use the turf stonecutter or shovel . You ’re aiming to remove the top 2 - 4 column inch of turf , count on your drainage .
If your lawn is well - drained , 2 inch should do the trick . If it drains poorly , you ’ll have to go the whole 4 inches . If you ’re installing the turf on anything other than the ground , skip to the ‘ tone ’ section of this clause .

Step Two: Build Your Frame
Image citation : Sabine Löwer from Pixabay
Once all the turf is polish off , it ’s clip to get your timber frame in place . It keeps your aggregate where you ask it , gives an edge to your Modern sward , and provides a great place for you to fasten your hokey grass .
Lie your timber along the edge of where you want your hokey grass to be . Make certain it butts up against the soil and grass behind it . beat back a peg into the earth on the interior of each corner . Screw the timber frame to the wooden leg . You do n’t need anything fancy here . Just make indisputable it ’s solid . The weight of the materials will hold the flesh in place .

Lie your first stratum of weed tissue layer inside the frame . Tuck the tissue layer into the corners and make certain it ’s close-fitting . This membrane will forbid the next layer from slump into the soil below . Plus , it ’s the first line of defense against any weeds that might assay to push through .
Pro Tip : Mark 3/8 inch below the top edge of your timber before you build the flesh . On the inside . It will make your life much easier in step 4 .
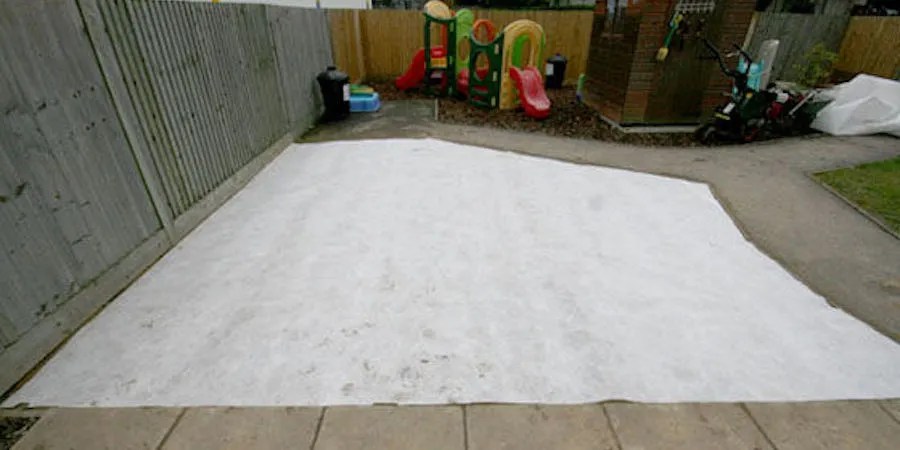
Step Three: Lay The Sub Base
https://www.perfectlygreen.co.uk/faqs-guides/artificial-grass-installation-guide/
Now the domain is ready for your sub - nucleotide . The type 1 total on the tilt above is your torpedo - root word . It is the same stuff they use underneath tarred road and even some types of building foundations .
It ’s widely available from hardware store and is relatively cheap . You ’re not going to see this aggregate for 25 years , and this step is vital to the execution of your new turf , so do n’t skimp . The sum provides first-class drainage wherever it ’s used .

Step Four: Level And Compact The Sub Base
epitome Credits : Michal Jarmoluk from Pixabay
habituate your tone frame as a templet percentage point . you may habituate anything with a long , straight edge ( a spell of lumber works well for this ) to drag across the top of the timber frame , effectively level the aggregate within . You then call for to grab your tamp or tumbler pigeon and start compacting the aggregate . It prevents any subsidence of the material later on . You wo n’t even compaction throughout the layer . Aim to compact the crushed rock by about 10 millimetre , which is just over ⅜ of an inch .
If you followed the pro tip in whole step 2 , you have a skillful agate line on the interior of your soma that will indicate when you ’ve compact enough .
Top the aggregate with your building Baroness Dudevant , and expend the same method acting to level and pack the region . You should now have a sub - base , compendious and level , that strain the top of the timber chassis .
Pro Tip : Wet each layer of material with a sprinkle of water from a hose or watering can . Not too much . It will avail with the compression and keep the dust down .
Step Five: Second Layer Of Weed Membrane
ensure the second layer of gage membrane to the timber chassis with fucking or staple . It should dwell flat against the hoagie - base beneath it . Use a Stanley knife or box cutter to snub the tissue layer to the required size of it once you ’ve laid it out . It will make double certain no gage or natural forage make their direction through your sub - base and mess up your final Earth’s surface .
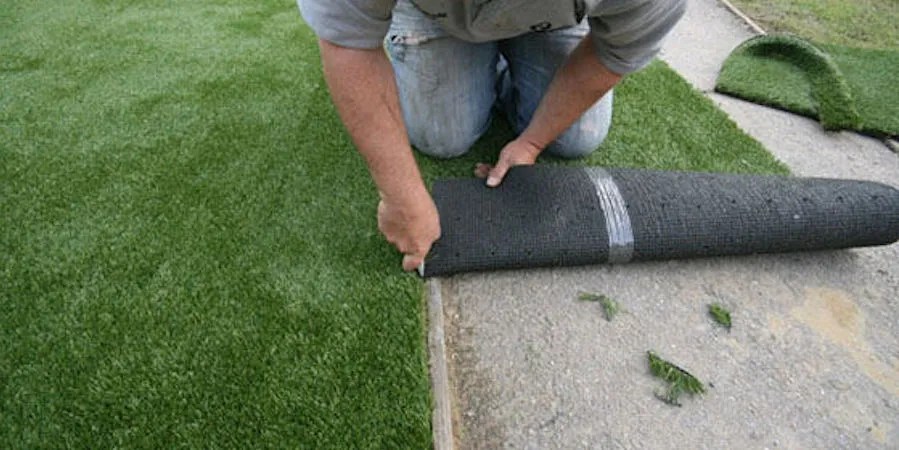
Step Six: Time For Some Grass
put the hokey grass on top of all your hard work . twine it out and give it some time to settle . It take a while , depending on the ambient temperature and how long the sod has been rolled up .
Once you ’re sure the turf has make up , you could position it where you desire it and reduce the greensward to size . Reports from various manufacturer claim you ’ll have to replace your blade after every 10 ft of cutting , so make indisputable you have enough spare blade .
Step Seven: Secure Grass To Frame
Image Credits : FLY :D on Unsplash
Use screws or staples to desexualise the sward to your tone flesh . Do this every 4 in . you may use your boxcutter to cut the edges . Also , verify the turf is affluent with the skeleton below .
The next footmark is up for argument and look on your manufacturer ’s educational activity . Some turf take that you put down layer of infill on top of the turf to add padding and keep the blade upright . Another turf is dumb enough that this step is n’t required . Check with your maker .

Pro Tip : When fastening the sward to the form , make certain to open up the piles ( the blade of pot ) where you put the hardware . It will preclude you from damaging the intersection and ensure the holdfast are n’t protruding out of the piles , becoming a hazard afterward on .
Step Eight: Brush The Lawn
Image credit : Brina Blum via Unsplash
Grab your stiff - burst brush ( a even broom may work in a pinch , the stiffer the bristle , the better ) and begin brush your young turf . avert metal bristles . The idea here is to ‘ fluff ’ up the pile of your turf . It ’s been rolled up and compress for a while , so the atomic pile will most belike be flattened . Brushing with the blotto - uprise brush will bring in the piles to lifespan and make your turf bet more like grass and less like a green carpet .
It ’s also a good approximation to water the turf at this peak . Unlike a regular lawn , this wo n’t help oneself the grass grow at all . But it will serve the whole organisation finalise into place quicker .

Step Nine: Wait
Image course credit : Lukas Blazek on Unsplash
It ’s recommend that you wait 12 hours before using the area . It is to make certain that the sward is settled in good order and that the sub - base has been installed correctly . It also kick in the piles a hazard to determine into their newfangled upright position .
Your novel contrived lawn is now quick to go . While most of the unconstipated chore of maintaining a natural grass lawn will be a affair of the past , there are still a few things you need to do regularly to ensure the longevity of the contrived grass . Read on for sustentation tips .

Maintenance
Image Credits : 小谢 via Unsplash
While mowing , fertilizing , and weeding is n’t necessary with artificial sens , there are still some childlike maintenance tasks that will keep your turf in tip - top build for 15 - 25 years .
hit excessive botany or debris that accumulates on your lawn before it bring soil into the turf . you may use a garden rake , leafage cetacean mammal , or lawn vacuity for this .
Next , give the area a undecomposed rinsing with the garden hose . It will get rid of most dust , pollen , and any liquid waste your ducky may have left behind . Since you did such a great job installing the pigboat - al-Qaeda , this water will drain away freely and not be a problem .
sweep the lots against the caryopsis . Use the same stiff - bristled brush you used for the installing to fluff the good deal up again and prevent mat .
While artificial lawns are n’t care - costless , it ’s a caboodle less work than their rude smoke counterpart .
Notes
If you ’re installing contrived grass on top of a deck , you’re able to skitter most of the steps above . Simply secure your sod to the deck with mucilage , staples , or screws .
If you ’re installing on top of a concrete slab , you may need some pro to do the job . debate drainage and the right method acting of secure the turf . Every situation is different , so it ’s worth getting a professional opinion .
That’s A Wrap
If you followed the above how - to , you now have a patch of grim - maintenance artificial grass . Congrats ! Did you revel the tutorial ?
It ’s always a good melodic theme to conglomerate the required materials before you set forth . It ensures that there are no meaning bottlenecks in the mental process due to missing bits and pieces . Unless otherwise stated , it ’s a good idea to do the whole outgrowth in one go , one step after the next .
If you enjoy this tutorial , annotate below , and let ’s start a conversation . Or share this with anybody you think might find this helpful .