Sharpening pruning shears is very important so you’re able to get the perfect cut every time . It may go like a flock of work , but it ’s actually pretty light . In this place , I ’ll show you exactly how to clean and sharpen garden shears , step by step .
If your garden shears have gotten a fiddling dull and rusty , you do n’t have to buy a whole newfangled pair . Sharpening pruning shears yourself is comfortable than you think !
There ’s no need to spend a bunch of money either . With a piddling piece of meter and elbow lubricating oil , you may have those old hoary garden tools looking and go like new again .

Different types of sharpeners for garden tools
Plus , taking the time to focalize your shear on a veritable ground will not only make them last longer , pruning plantswill be sooooo much easier for you ( and tidy for your garden too ) !
What To Use To Sharpen Garden Shears
Every sentence I babble about this topic , one of the first question I get asked is “ what cock do you utilize to heighten garden shears ? ” .
The good newsworthiness is , you have several options to choose from . Heck , you might already have a sharpening peter on bridge player that will do the job just fine . Here are a few of the most common …
How To Sharpen Pruning Shears
The good news is that it ’s exceedingly easy to sharpen pruning shears , and it does n’t take long to get them working ( and looking ) like mark new again .
Plus you do n’t call for many supply to get the occupation done . You probably already have most of this stuff around the planetary house .
Supplies Needed
Step By Step Instructions
1. Clean Your Pruning Shears
Before focalize pruning shears , it ’s a good mind to clean them to remove any gunk that has build up over time . This will get rid of any impediments that might get in the direction while sharpen the blade .
This might just be a affair of pass over them off with a dampish ragtime , if they ’re not very dirty . But if yours are as neglect as mine have been , then fall out these step to clean them up .
tone 1 : Wash them – dampen your pruner with max and water to remove the poop , then pass over them off with a moist tag end afterward .

you may rinse them off with weewee when you ’re done , but do n’t soak them . That could do more harm than good , and cause the metallic element to rust faster .
footfall 2 : Scrub them if necessary – If there ’s coat on dirt and grunge that wo n’t fare off easily , expend acleaning brushto scrub it off .
If necessary , ruborange essential oilor a production likeGoo Goneonto the blade to remove any tough muck and sticky sap .

While you ’re at it , verify to strip the handgrip and other share too , do n’t just focus on the blade . You might as well take a few supernumerary minutes to make them look brand raw again too .
2. Remove Rust From The Blade
Sometimes rust can make up on the blades of garden shear . This can cause them to stick together , which makes them difficult to expend .
So , if any of your pruning tool look like my hedging trimmer , then perform these actions to dispatch the rust from the vane . Otherwise , skip to section3 : sharpen Pruning Shearsbelow .
Step 3 : Use a telegram brush to move out tough rust musca volitans – First , brush off any thickset rust spots with awire coppice . You ’ll also necessitate to employ it to absent the rust around the edge , and in any crevices .

Step 4 : Clean rust fungus off the blades with sword wool – Now you may scrub the blade withsteel woolto clean-living off any remaining rusting .
It only takes a few minute to get the blades all smooth up and looking brand novel ( plus it ’s a really salutary tricep workout , bonus ! ) .
With a little morsel of elbow stain , your garden shears will look blade new , and be quick for sharpen . Amazing !

3. Sharpen Pruning Shears
Once you ’ve cleaned your garden shears and removed the rusting , it ’s clip to sharpen the sword .
you may follow the step below to focus any character of pruning shears . Whether you have large or lowly hand pruners , preciseness snips , hedge trimmers , or loppers .
Step 5 : Find the correct slant – Hold thesharpening toolagainst the blade at the same slant of the existing bevel square ( usually about a 20 - 25 degree slant ) .

If you ’ve never sharpened lopper before , it might take some practice to get the correct slant on the leaf blade .
Step 6 : focalise the blade – Working from the base to the tip , scrape the tool sharpener down the duration of the brand in one fluid stoke , pressing it firmly .
reprise the same legal action 10 - 20 clock time ( for top-notch dumb blade , it could take 25 - 30 stroke ) .

Many type of pruners are only piercing on one side of the blade , and the other side is flat . If that ’s the case with yours , you only need to focalise the blade side , and depart the 2-dimensional side alone .
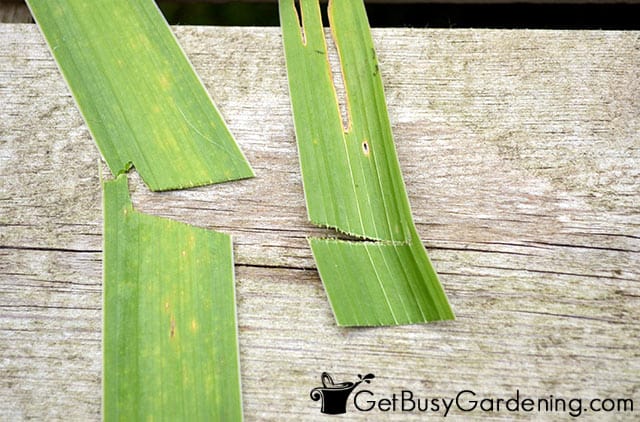
Step 7 : screen for acuteness – Test the sharpness of the blade on some foliage or branches after each series of stroke . Once you get a clean-living and easy cut , then you know you ’re done .
4. Lubricate The Blades
This step is completely optional , but I highly recommend taking 5 minutes to lube your pruning shear blade after sharpening them .
This will make your laborious work last much longer , and protect the metal from succeeding rust and grime buildup .
Step 8 : Polish the blade with lubricating oil – For this step , I like to use a more natural product , likelinseed oilormineral oil . But you could certainly use3 - in - oneorWD-40 , if that ’s what you have on hand .

Simply spray the blade with the lubricating oil of your option . Then utilise dry rag week to rub it in , and pass over off the surplus .
Now you’re able to sit back , and savor your attractively sharp and like - new pruners . Or , if you favor , put them to work right away .
Properly sharpened pruning shears make all the departure . Not only are they better for your works , but maintaining sharp blade will make pruning so much easy for you too .

More Posts About Garden Tools
More Posts About Pruning